Most of the outcome is decided before you break ground
Most of the money on a San Gabriel Valley residential project is made or lost before construction starts. The lot, the team, the program, the bids — those decisions compound. By the time framing starts, the outcome is largely written.
This isn't a textbook. Nobody needs another explainer on what a structural engineer does; any AI tool covers that in ten seconds. What follows is the sequence, the six rules that are easy to state and easy to violate anyway, and the fork every SGV owner with a lot faces without realizing it's a fork.
The fork: which kind of project is this
Before the seven phases, the question that sets your timeline and your fee exposure.
| ADU | Small infill (2–30 units) | Ground-up (single-family) | |
|---|---|---|---|
| Total, land to keys | 6–9 months | 18–36+ months | 21–42 months |
| Permit path | Ministerial (by-right) — no hearing | Discretionary — though state streamlining laws (SB 35, AB 2011) can shift some affordable or mixed-income projects to ministerial | Discretionary |
| Fee exposure | Exempt from impact fees under 750 sq ft | Full impact, park, school, and utility fees | Full impact, school, and utility fees |
| Who it's for | A homeowner with an existing house and a yard | A builder or investor assembling a few lots or a larger parcel | An owner replacing a house or building on a vacant single lot |
If you have a back yard and some equity, see ADU or Ground-Up? The Two Timelines, Side by Side — that's this fork, worked in full.
The Six Commandments
Before any process or framework, internalize these. Every expensive mistake traces back to violating at least one.
- Don't always hire the cheapest contractor.
- Don't always use the same contractor.
- Never use a contractor who isn't licensed and insured.
- Don't pay contractors too early.
- Never start a job without a detailed budget.
- Always put a timeline on the project.
Simple to say, hard to hold. The cheapest contractor wins more bids than they should because the spread looks like savings — until change orders and rework, from a scope that was never pinned down. The defense isn't watching your contractor more closely — it's a documented scope and a payment schedule you hold to, no matter how good the relationship feels.
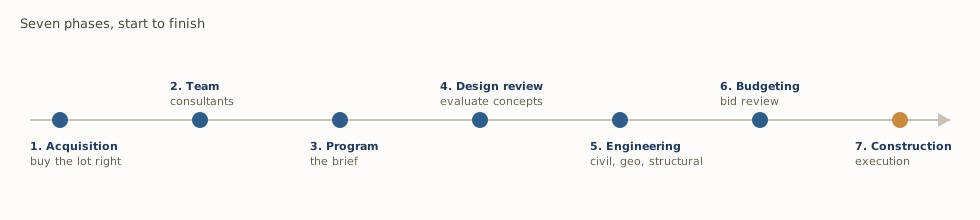
1. Acquisition. You make money when you buy the lot — and the reason is narrower than it sounds. Acquisition is where you set the projection the whole deal gets approved on: estimated cost to build, estimated sale price, required return. From that moment the budget is treated as firm, even though it was built before anyone drew anything. If the numbers later come in high, your only remaining lever is cutting design, and that lever is short. On a hillside lot it's shorter still — you cannot value-engineer your way out of a retaining wall. Before you make an offer, work the land due diligence checklist — topography, utilities, zoning, title, survey, geotech, cheapest checks first — and if the lot slopes, read building on a hillside lot before you underwrite it.
2. Building your team. Five to ten consultants on a typical project. Two questions outrank every project-specific one: how many projects are they juggling right now, and have they worked in this city before. Local plan-check experience beats résumé prestige.
3. Writing the program. The program is the brief you hand your architect — home type, scale, and how the design fits the neighborhood you're actually building in, not the one you wish existed. Skip it and the architect interprets vague intentions, which produces a house that's beautiful and unsellable. The full checklist — market-competitiveness questions included — is in writing the program and reviewing the design.
4. Reviewing preliminary designs. Read concept drawings as a developer first, a homeowner second: efficient to build, easy to permit, competitive to sell. Give the driveway and garage more attention than feels warranted — you'll use them daily, and so will every future buyer. Keep the roofline simple: peaks and valleys look distinctive on a rendering but add real complexity and leak risk in the field.
A short list of things to avoid outright, independent of the specific design: patios built over living space below (the leak is eventually inevitable, the repair invasive), rounded staircases with glass, flat roofs, basements when the lot allows an alternative, heavy precast detailing, a run of windows with no structural break between them, skipping HVAC duct and return-register space, and excessive French doors. Room proportions, kitchen workflow, and the reasoning behind each of these live in the same design review checklist.
5. Engineering essentials. You don't need to be an engineer. You need enough literacy to ask sharp questions and catch obvious problems: reading TW/FS/FF/FG/TF/INV on a site plan, knowing that a "0.3" on a plan means four inches and "0.5" means six, knowing that a 2% slope away from the house is what keeps water out, and knowing that a structural beam can't be cut once it's set — that's code and structural engineering, not a preference, so plan around it instead of asking for an exception once framing is underway.
That last one is why AC ducts get planned during design, not discovered during framing: they end up hidden either inside the floor joist cavities or dropped from the ceiling, and a hallway hides that drop far more gracefully than a bedroom does. Floor joists also run the shortest distance between walls, which doubles as a way to guess where the structure actually is later — useful if you're ever remodeling and can't open a wall to check.
These sound like trivia until they aren't. A construction manager joining one of my projects found, in his first pass, a roof line an inch and a half off, a balcony elevation wrong, and a drainage slope that didn't drain — none of which was anyone's incompetence. The team had simply looked at those sheets so many times they'd stopped seeing them.
6. Budgeting and bid review. Budgets fail two ways — built too early, before the design can support an estimate, or accepted without a line-by-line review, so the cheapest number wins and the real cost arrives later as change orders. Every budget carries a margin of error set by the phase it was built at; see the table below. Full cost figures, indexed and cross-checked: What It Costs to Build in the San Gabriel Valley.
7. Construction execution. Your role shifts from designer to monitor: verify that what's being built matches what was designed. Before grading starts, check the season's weather odds and plan around them — you can't grade in the rain, and getting rained out mid-cut means re-cleaning every trench before you can pick back up. Foundation pours happen in one continuous sitting, rebar never touches the ground, and plumbing and AC rough-ins go before electrical.
Most of what happens from here on is trade expertise — grading, framing, structural sequencing — that isn't yours to master, and you shouldn't try to be. Go back to the F1 pit crew: the designer isn't the one turning wrenches trackside, and the car still wins because the crew communicates and solves problems in real time without radioing every call back to the factory. You're not on site enough to be that radio. The real skill at this phase is the one you already exercised in Phase 2: you hired a general contractor whose superintendent has seen enough jobs to catch a mistake nobody else does, the way the construction manager above caught three in one pass. That's what the fee is actually buying — trust earned before construction starts, spent during it.
What's knowable, and when
This framework holds on every project and doesn't go stale with inflation — only the dollar amounts under it move.
| Project phase | Margin of error | What's available |
|---|---|---|
| Conceptual estimate | 25–50% | Square feet, unit cost assumptions |
| Schematic design | 15–20% | General building layout, footprint |
| Design development | 10% | Detailed exploration, specifications |
| Construction documents | 5% | Complete drawings and specifications |
Treat those ranges as the optimistic version. The construction cost estimation course I took put schematic design closer to 35–50%, and my own projects behaved more like that number than the tidy one above. AACE International publishes a formal classification of the same idea (18R-97 for process work, 56R-08 for building construction) and its early-stage classes run wider still. If you want one takeaway, take the direction rather than the digits: early estimates are less reliable than they feel, and the tidier the table, the more likely it is understating you.
If you haven't worked with a given general contractor before, add 5% on top at every phase.
Why the range is wide has nothing to do with arithmetic. One wall and twelve walls enclosing the same square footage are completely different material and labor loads, and at a conceptual estimate nobody has decided which one it is. That's also why AI-assisted takeoff tools — which have gotten genuinely good at counting what's on a drawing set — don't collapse this table. Faster quantities off an incomplete set is still a 25–50% number.
What this is really an argument for is a team. My own mentor, running these projects for decades, reckoned he personally caught about 30% of the mistakes; the rest got caught on site by somebody else. That's not a confession of weakness, it's how the work actually functions. Treat it like an F1 pit crew: every department shaves a tenth of a second, nobody is at fault for the tenth they didn't shave, and the sum across the whole car is what wins. One fewer change order from each consultant compounds into real money by the end of the job. Re-price at every design phase, and build a review process that isn't only you.
Appendix: quick reference
Common dimensions and specifications, useful during design review and construction. Verify against current code and manufacturer specs before committing to plans.
| Room | Typical dimensions | Notes |
|---|---|---|
| Living room | 12' × 13' | Minimum for comfortable seating |
| Dining room | 10'×12' to 12'×16' | Larger for formal use |
| Kitchen | 10'×10' to 12'×16' | Island min 3' × 6' |
| Master bedroom | 12'×14' to 16'×20' | |
| Bedroom | 10'×10' to 12'×12' | Below 10×10 reads as small |
| Bathroom | 5'×8' to 8'×10' | 5'×8' is the common code-minimum full bath |
| Family room | 19' × 18' | Avoid larger than 25' in any direction |
| Garage (single / double) | 12'×22' / 20'×22' |
| Civil engineering abbreviation | Meaning |
|---|---|
| TW | Top of Wall |
| FS | Finished Surface |
| FF | Finished Floor |
| FG | Finished Grade |
| TF | Top of Footing |
| INV | Invert (drain elevation) |
| HVAC tonnage | BTU | Sq ft coverage |
|---|---|---|
| 1.5 | 18,000 | 600–900 |
| 2.0 | 24,000 | 900–1,200 |
| 3.0 | 36,000 | 1,100–1,600 |
| 4.0 | 48,000 | 1,600–2,100 |
| 5.0 | 60,000 | 2,100–2,500 |
Verify HVAC sizing with a Title 24 consultant or licensed HVAC contractor — climate zone, insulation, and orientation all move the real number.
Where to go from here
The rest of the series goes phase by phase: the land due diligence checklist before you buy, what it actually costs to build once diligence clears, who you need to hire to get it drawn and built, writing the program and reviewing the design once that team is in place, the ADU-vs-ground-up fork if you already own the lot, and building on a hillside lot if the ground moves. Evaluating a specific San Gabriel Valley parcel? Schedule a consultation.